The 4th week of the #MTBoS blogging initiative and this time we’re talking about a specific lesson.
After a few years of teaching, it’s nice to go back and look at how lessons have changed over time.
So, the first time I tried this lesson was in my first year of teaching. The students had been working hard on textbook exercises on Area, Surface Area and Volume.
I was on my way to class, knowing that I needed to check their understanding of the unit. I also had absolutely nothing prepared and I didn’t want to subject them to the dreaded chapter review.
So on the walk to class, I managed to form a rough idea in my head. My friend calls this “corridor curriculum”.
Here’s how the board looked by the end of the lesson.
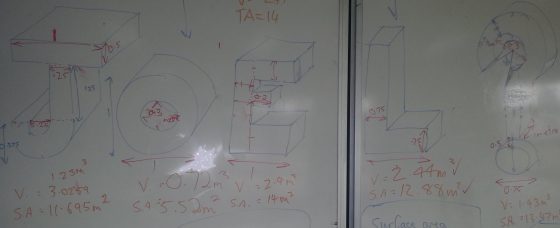
The idea was simple. I wrote my name in 3D letters and put some relevant dimensions on there. Then I assigned them a letter to work on based on where I thought they were at. “L” for the students having trouble, J for the more advanced students.
They started with volume, then with surface area. Students progressed through the letters. As I was making this up as I went along things naturally progressed from there.
Eventually some of the faster workers were googling the price of gold per kg, finding out the density of gold, then figuring out how much it would cost to make. Others decided to paint it and found the cost of doing that instead.
It really felt like a successful lesson. I felt like I’d hit on some real gold in terms of differentiation.
Since then, my philosophy has changed a lot. Here’s how I plan to run the lesson this year.
The “lesson” is now a few lessons long and happens AT THE START of the unit, not at the end. And here’s what it looks like.
You are going to make a sign to put up at school. The sign will be made of solid, 3 dimensional shapes as shown below.

Your Task is as follows:
- Design the structure and draw a diagram with all dimensions shown. Your design should be unique to you. The only constraints are as follows:
- All letters are written in capitals
- All letters are drawn in traditional form (ex. a “D” must have a curved form)
- The letters will be solid and can be made of whatever you like.
- The sign will be painted whatever colour you choose.
- Do research and use mathematics to find the total cost of materials to build this monument (materials and paint)
- Do you think it is reasonable to use the materials suggested to construct this sign? If not, what alternative do you suggest?
Note: If you need help, there’s plenty of videos at www.youtube.com/c/joelsperanza on Area, Surface area and Volume, your friends are here in class and your teacher is always around.
Have fun.
I’m excited about this sort of, independent/collaborative Problem-based learning. No doubt it will look different next year.
What do you think I can do differently with this lesson?
It might be interesting to explore the weight of the sign. Design decisions impacting weight could influence how the sign must be hung, which in turn impacts cost….
It’s nice to see how you were able to differentiate five years ago just by using the letters of your name JOEL — but I’m wondering about the students who were stuck with the question mark — which looks the most difficult!
I enjoyed reading about how this began as a spur-of-the-moment lesson in 2011 and will now be a full-fledged project. I don’t see any ways to improve the lesson off the top of my head. It appears that the signs could be created by a 3D printer, but that’s expensive and I doubt anyone has access to one.
I look forward to reading about how this project turns out, even more so because I’m especially interested in Geometry lessons.
Thanks for participating in the MTBoS this year!
The question mark was an afterthought, for a couple of the students who nailed the J. It was super difficult for them, they really enjoyed it.
Definitely thinking I’ll go the 3D printer route, I know our school has a couple and I’ve been looking for an excuse to try one out.
I really liked seeing your Lesson progress over the years. I often find myself going back to early lessons I taught and either saying, “Wow my teaching style has changed!” Or just as often, “why don’t I remember teaching this lesson, it is gold!” I wish I had started blogging form the start to track those better than my random boxes that halved moved around the world a few times.
I know a few of the MTBoSers have a 3D printer. This would be a fun end to the unit if it was possible, print a mockup of the signs for the class.
I like both of the lessons, and I’m so impressed that you came up with the first one on the spot! Is the second lesson something that is done as a project, or over a few days in class?
Do you think by not giving any dimensions first and asking students what is needed to find the volume or surface area would draw them in more? In this case, the task may be low floor inviting students to reason and make sense of ideas before chugging away with formulas?
Love seeing the progress! Would be so cool to do this in a makerspace…especially with calculating the actual volume of 3D printing material used.
Everyone is talking 3D printers and I know our school has a couple. Been looking for an excuse to use one, here’s my chance!