“Flipped Learning is NOT about making videos…” I hear this so often when flipped learning gets discussed. I myself even gave a talk at Flipcon last year with this exact title.
But the truth is, it kind of IS about the videos.
I understand the sentiment. Everyone who flips knows that the real benefit to flipped learning is what happens in your classroom. It’s the extra time you have for collaboration, for 1:1 chats with students, for feedback. It’s the face to face time that really matters!
But what you can’t get around is that when it comes to flipped learning, the new part, the hard part, is making the videos.
The video making bit is the barrier to entry. There are just so many unknowns around it.
- How do I make the video?
- Won’t I look stupid on camera?
- What software do I use?
- Do I need a video camera?
- Won’t it take a super-long time?
- How do I share it with my students?
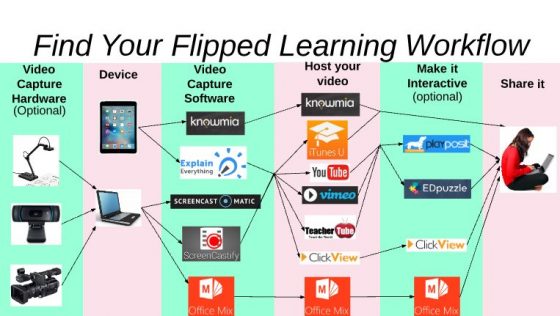
So… Let me break it down. Here’s what you need on the video side of a flipped classroom:
 For a “clickable version” of this image, follow this link.
Before you have a look at the options for video making. Think about how you want your video to look. Remember, your students won’t care. Just pick a way that works for you. Here’s some ways that I make videos.
 To see the slower, video version of the above gif, click this link.
Video Capture Hardware (optional):
A webcam is usually built into your device (the next bit in the list) so you can use that. I often use a document camera so I can film myself drawing on a real life piece of paper. You can use a dedicated video camera but I feel like this adds an extra step in the process you could do without. I also use a lightboard, as you can see above. If you’d like to build one, click here to find out how.
Device:
You’ll need one of these, but luckily we’ve all got one. Computers all have webcams on them, a tablet does too. You can also use your mobile phone if you’re interested, great for those PE teachers among us who need to capture video in the great outdoors.
Video Capture Software:
Now here’s where things get more interesting. If you’re on a tablet or on your phone you’ll have video recording software built in. Just point the camera at yourself and press record. If you’d like to record your tablet screen instead, there are several options out there: Explain Everything, Knowmia, Showme, Educreations. Pick one and stick to it until you have a good reason to switch.
If you’re on a laptop, I’m increasingly convinced the ONLY choice is Screencastomatic. It’s free, or you can spend $15 a year to get the bells and whistles version (I recommend!). It will record your screen, your webcam or both at the same time. The paid version also has amazing editing features. If you’d like to learn how to use Screencastomatic, I’ll teach you how here. Of course, for the sake of balance, you can check out its poor cousin Screencastify. A selling point of Screencastify is that it will work on chromebooks, so if you happen to use one of those, Screencastify is for you.
If you think your videos are going to be PowerPoint-style videos, you could also consider the microsoft add-on Office Mix. I don’t roll that way but it works and, if you refer to the diagram above, solves hosting and interactivity for you as well (more on that further down).
Now that you’ve got the first three steps done, time to make a video.

Host your video:
So your video is made. Now you need to put it on the web so your students can watch it. Some options, in no particular order are: Itunes U, YouTube, ClickView, Vimeo, Office Mix (if you made your video with it).
Your school, State or district might have another option as well. Here in QLD schools, we can use EdTube. Schools with an LMS like Moodle, Blackboard, Canvas, Haiku etc also usually have hosting baked in.
If you’re not sure, politely ask your IT department which of these options would work for sharing videos to your students.
Making your video Interactive (optional):
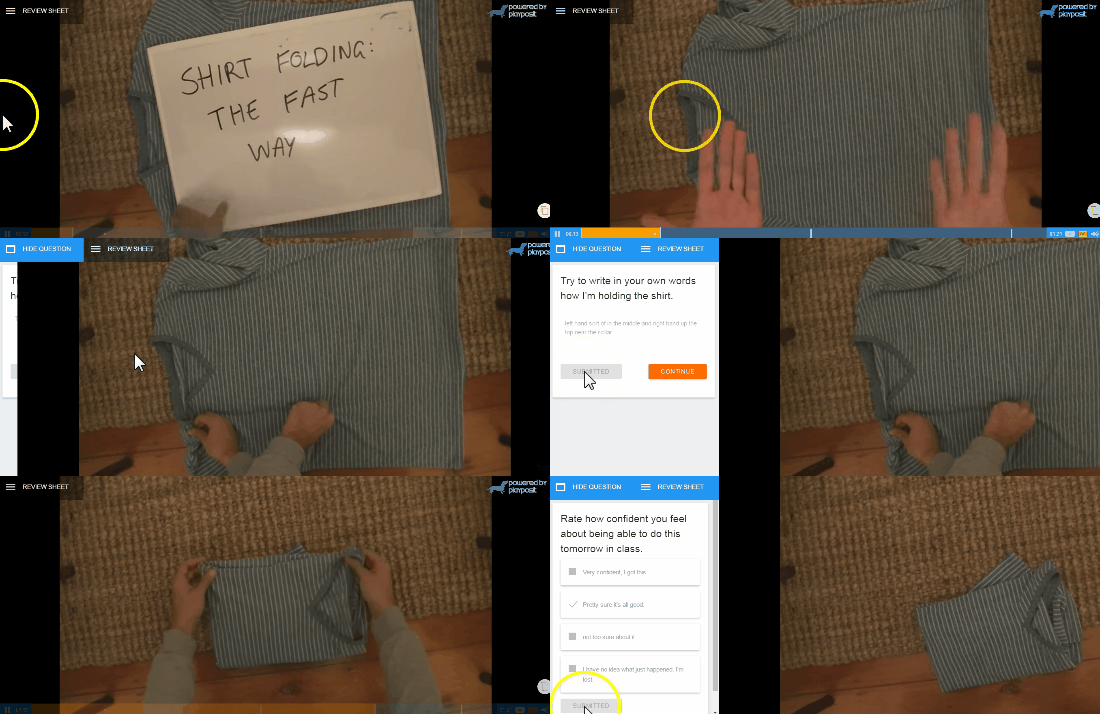
If you haven’t seen what websites like Playposit or Edpuzzle can do with video, I definitely recommend taking a look. Videos become interactive lessons, with embedded questions creating greater engagement and allowing you to get information on students’ understanding of the content.
Playposit Example
 Click here to experience that lesson in full
That said, I actually don’t use them in my classroom. I find they add more time to my process without enough added benefit.
You should definitely check it out though, you might love it!
ClickView actually has this interactive quiz thing baked into their hosting, which makes things a bit easier.
Sharing the videos with your students:
Now you just need to get the link to the video/interactive lesson to your students.
If you have an LMS, sharing these links should prove pretty easy.
In the past I’ve shared a Google doc with classes at the start of the term and added links to new videos and resources as the term progresses. Sort of like a live Hyperdoc. You can see one of mine here.
Now, I use the all new Google Sites to create a website to host all my videos on. You can see what my website looks like here.
Whatever you choose, it should be a single clearing house where students can continually come back to over the term and find the videos they watched weeks ago.
Resist emailing the videos every day to your students. They get lost in the mess of the inbox.
In Conclusion
After all that you might be feeling more confused than when you arrived here. Sorry about that. But please remember this.
YOU ONLY NEED ONE WORKFLOW. Find what works for you and do that.
Once you’ve got your workflow sorted, it’s really not about the videos.
Until then, it still kind of is.
Reblogged this on Educating The Digital Learner and commented:
Another perspective on how to decide what to put in your digital toolbox. Workflow is important in determining the devices and software that are really important to you. Thanks to Joel Speranza.
I like your description of workflow and sits really nicely along your digital toolbox discussion last year at FlipCon. I have to also agree with you about ScreenCast I am forever finding new features and quicker ways of editing with this software. $14 is a bargain for the software since I disliked the watermarking. If I only I could host videos where I wanted. 🙂 http://www.educatingthedigitallearner.com
Crystal